
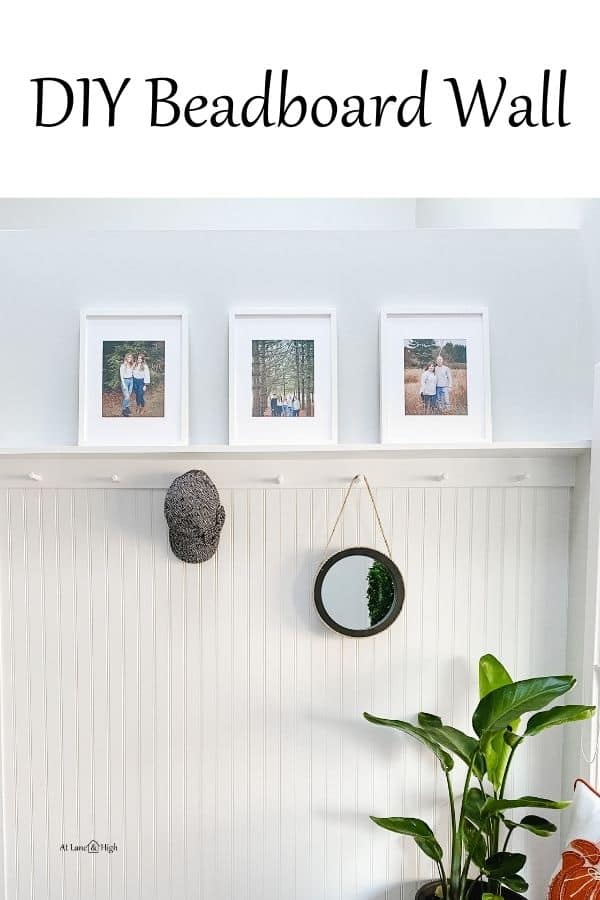
DIY Beadboard Wall {How to Install Beadboard over Drywall}
If you have a space that is really lacking in style and has lots of drywall then I highly encourage you to give a DIY Beadboard wall a try. It’s extremely cost-effective and adds so much interest to a room that you will love the results!
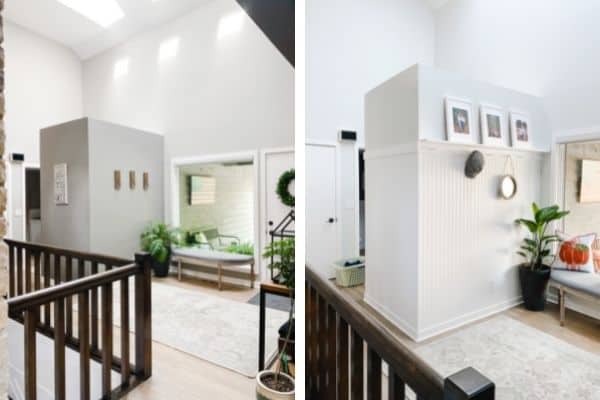
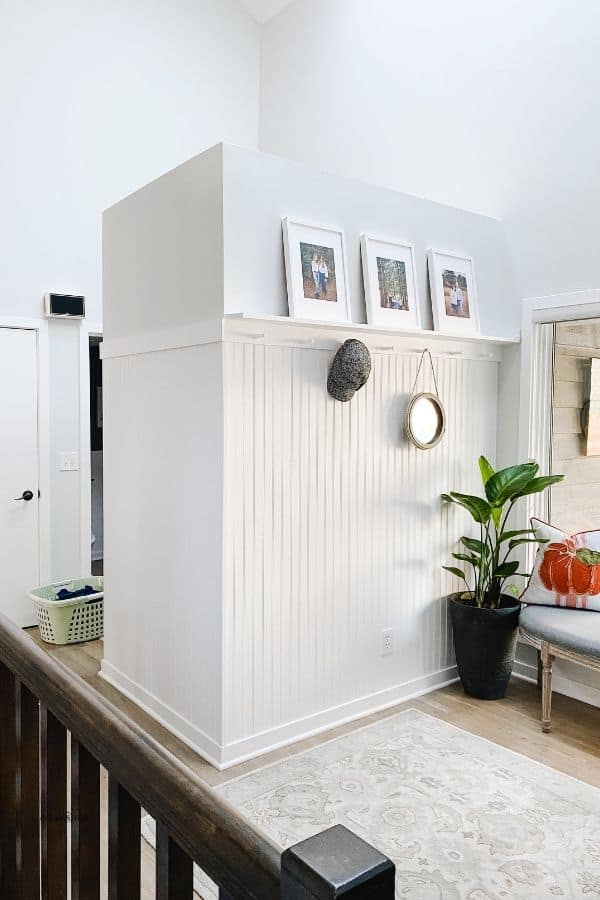
I have this amazing entryway. It has 16 foot ceilings (so lots of drywall) and a lot of square footage. There is also this amazing stone wall which is the back of the fireplace and usually captures the attention of anyone who enters my home.
Once you get past the wall of stone you notice all the drywall. There is a ton. One wall has a console table and the opposite wall has a few hooks for coats. This is the wall that has been bugging me since the day we moved in.
This wall takes a beating with hanging coats and purses, kicking off shoes next to it. And the wall that meets it perpendicularly is like a hallway and it also takes a beating (mostly from my dog when she gets the zoomies and runs in circles around the house).
I have been kicking around ideas. I could do board and batten as I did in my dining room and stairway. Or I could do tongue and groove like what is in my bathroom but that can get pricey. This project needs to be on a budget, and easy.
So I finally decided on beadboard. It comes in 4X8 foot sheets at the home improvement store and you can have them cut it right there in the store.
FAQ’s on How to DIY a Beadboard Wall
Is beadboard hard to install?
Installing beadboard is one of the easier wall treatment projects you can do. You can have the beadboard cut at the hardware store so it’s much easier to install once you get home.
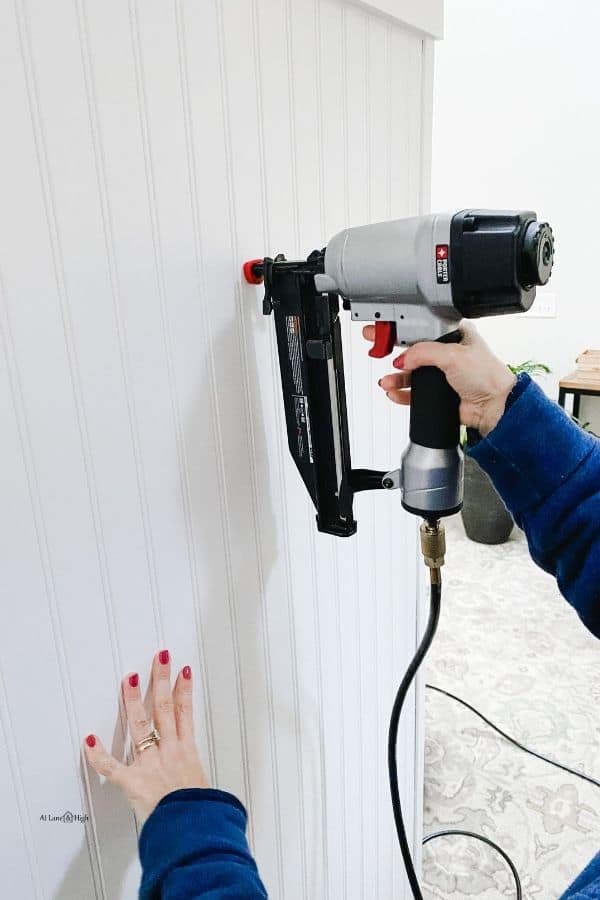
If you use adhesive then you will need fewer nails. The nails are really just there to hold it in place until the adhesive dries. You can use a hammer and brad nails for this part. You won’t have to have a nail gun as I used.
Do you have to glue beadboard?
No, you do not have to glue the beadboard. You will see as you go through this post that I did not use any adhesive at all.
The reason I didn’t use adhesive is that if someday I want to pull this off the wall the adhesive will pretty much destroy the drywall. It took a few more nails than it would have if I had used adhesive but I can patch up nail holes a lot easier than I can replace drywall.
Does beadboard go on top of drywall?
Yes, you install beadboard right on top of the drywall. What is really important though is that you mark the drywall where the studs are prior to installing your beadboard. You need to nail the beadboard to the studs to make sure the beadboard stays put long term.
*This post contains affiliate links. For more details see my full disclosure.
DIY Beadboard Wall
The first thing you need to do when attacking this project is to determine the amount of beadboard you will need. Measure the wall you want to do and decide how far up the wall you want to go.
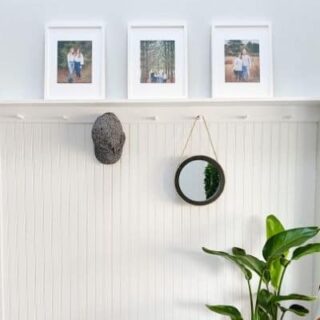
Some might go with more of a wainscoting where you will only go up about 33-36 inches. Others might go all the way to the ceiling. I wanted to go about 6 feet high so that I could have a board with pegs to hang coats and purses up.
The width of my coat wall is 6 feet and the width of my hallway wall is 4 feet. With the sheets of beadboard being 4 feet wide I will need 3 panels.
At the time of writing this post, the panels of beadboard are about $22. So if I need three it will come to $66, plus a 1X4 at the top, a 1X6 shelf, and the pegs, this whole project will come in just under $100.
Supplies:
- 3 beadboard panels
- 2 – 1X4X8 boards
- 1 – 1X6X6 board
- 1 – Corner molding 6 feet long
- Pegs
- Nail gun – One of the best purchases I have ever made!
- Nails
- Drill – I like electric drills (they have a cord). Cordless ones always seem to have dead batteries and this one is waaaaaayyy cheaper.
- Screws
- Jig saw – I needed this because I had to cut out around an outlet. If you don’t have one then you won’t need this.
- Miter Saw
- L brackets
- Primer
- Paint – This is my favorite paint for cabinets, trim, wall treatments and furniture projects. It holds up really well to bumps and dings.
- Caulk
- Wood Putty
- sandpaper
- Stud finder
- Paintbrush – This is my absolute faborite paintbrush. This is the exact one I use All. The. Time!
Now I had a lot of this on hand already. Specifically the paint, primer, caulk, wood putty, brackets, tools, etc. All I really needed to buy was the wood. If you do a lot of projects you will find that materials overlap for projects.
Step 1 – Measure the wall and mark the studs.
The first thing I did was prime the dark wall and paint it my new wall color. The part above the beadboard will show the wall color that I am currently painting throughout my upstairs.
Like I said earlier you need to measure the walls you intend to cover and buy the appropriate amount of beadboard. I had to buy three sheets and had the guy at Home Depot cut them 6 feet high.
One of the most important steps is to mark the studs so that when you nail your beadboard up it goes right into the stud. This will help hold up the beadboard especially if you aren’t using adhesive like I am doing.
Another tip, because I may or may not have done this, is to make sure you mark the wall above or below where you are putting the beadboard. You don’t want to mark it then cover it up with the panels. That sort of defeats the purpose of marking the walls.
Step 2 – Nail up the beadboard wall panels.
If you have an outlet or light switch that you need to cut out your beadboard to go around then this is the time to do it. Measure where the outlet will hit your beadboard and drill holes at the four corners. Use your jigsaw to cut the lines intersecting the holes to have a square.
I started at the corner of the two walls and put the beadboard on top of my baseboards. I have 1×4’s for baseboards so this was pretty easy to do. If you have thin baseboards then you might want to consider removing the baseboards, putting the beadboard on the floor then nailing the baseboards back on.
Once I had the panels in place I nailed them to the drywall where I marked the studs. I absolutely love this nail gun! I have used it so many times, it has more than paid for itself in lack of frustration of having to hammer and nail. You can do the hammer and nail thing but this is so much easier!
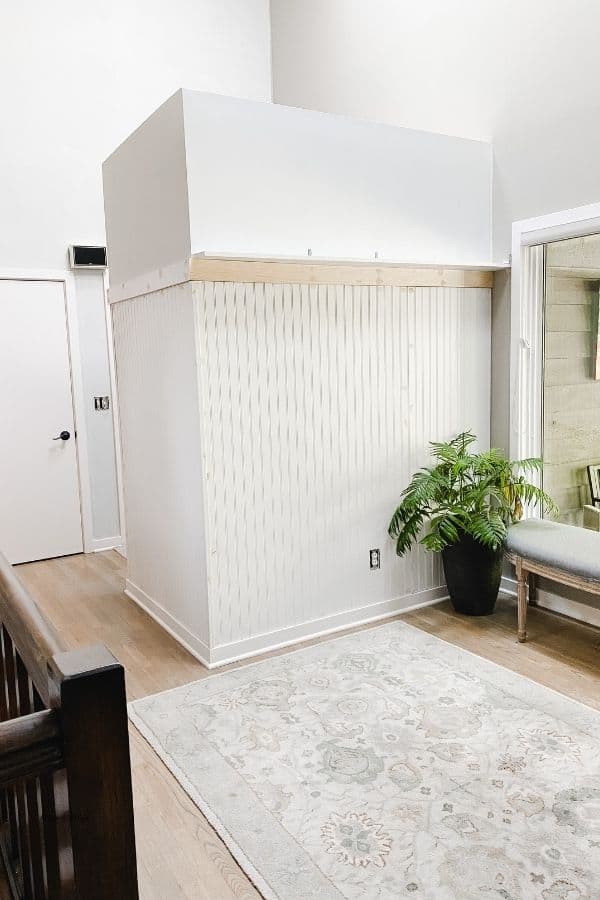
Step 3 – Install the top board.
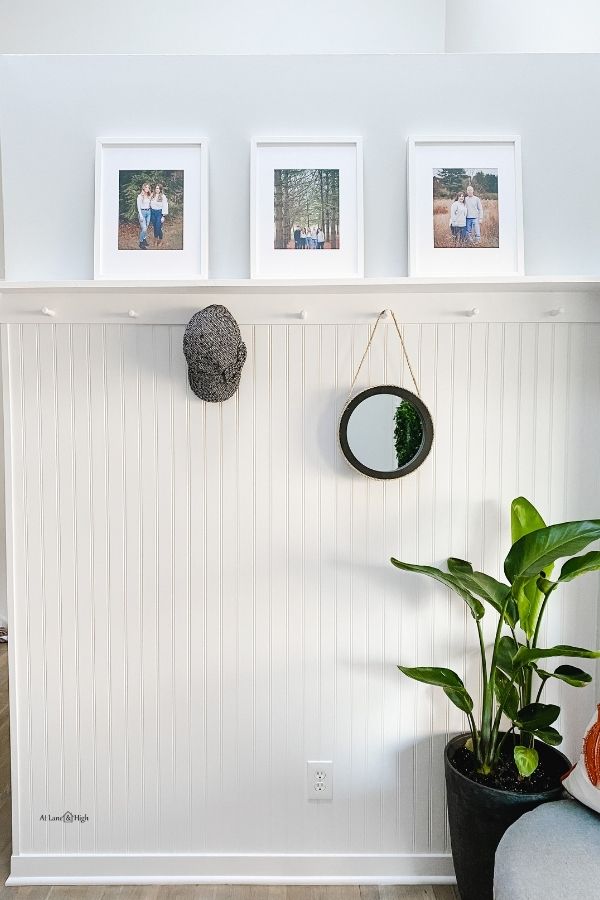
To have a more finished look I installed a 1X4 horizontally across the top of the beadboard. This is also where I will be installing my pegs so that we can hang coats from them.
Using your miter saw cut the corner at a 45 degree angle and screw to your wall, where you marked the studs. My wall was 6 feet long so one end went against the end of the wall that meets the front wall of the house and the other one I cut at a miter.
Would you like to save this?
Then the hallway wall got a miter cut where it meets the entry wall and the other cut piece of wood then I had a square cut at the other end of the hallway.
Nail these boards up where the studs are.
Step 4 – Install the shelf.
This is completely optional. I wanted a shelf here to display decor and photos. I had about 6 inches on the front wall of my house between the wall I am beadboarding (is that a word?) and the window so I chose a 1X6 board and it fit perfectly.
For the shelf, I nailed it to the 1X4 below it and used L brackets at the top to make sure the shelf didn’t come down. I used 3 L brackets for this shelf that is 6 feet long.
Once I was done I painted the bracket the wall color so it would blend in and now stick out like a sore thumb.
Step 5 – Install the corner molding.
The corner molding hides the ugly part where the two pieces of paneling come together at the corner. Just nail it up with your nail gun.
Step 6 – Time to caulk and putty.
You need to fill all the nail and screw holes with wood putty. Where the shelf meets the 1X4 and where the 1X4 meets the beadboard you want to add a bead of caulk. This hides any imperfections you have made in the cuts or those that exist in the wood.
I also caulked where the beadboard met the wall at the front of the house.
Once the wood putty is dry sand it down smooth.

Step 7 – Prime and Paint.
Make sure you put a coat of primer on any bare wood. Let it dry completely then apply your first coat of paint.
I would have loved to use a roller but with the grooves in the wood, I just won’t work. You need a good ole fashioned paintbrush. This paintbrush is my absolute favorite and I use it for all my projects.
Make sure you let the paint dry completely in between coats. I needed 3 coats of white to have full coverage.
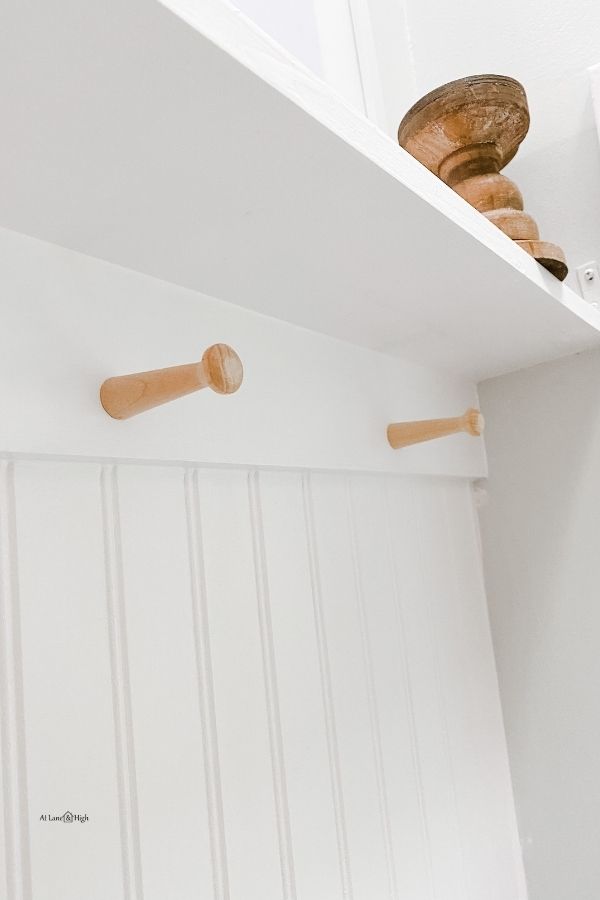
Step 8 – Install pegs and paint them.
You can paint your pegs before installing them or you can paint them after. You probably could even install them and then paint the whole thing (which probably makes the most sense but mine didn’t come in from Amazon until after I painted everything).
Use your drill to make a pilot hole and screw your pegs into the board. Then you need to prime and paint your peg. Anytime you have bare wood you need to prime before you paint.
**Pro Tip** If you have to cut out around an outlet or light switch you will likely need to pick up some spacers to bring the outlet (or light switch) out a little bit now that you added the beadboard. I had to do this when I installed shiplap in my laundry room too. It’s super easy to do just make sure you cut the power before messing with it.
The Finished DIY Beadboard Wall
I am obsessed with how this wall turned out. Not only is it more stylish than the plain wall it used to be but it has so many more places to hang coats!
Another thing I love is that the beadboard will hold up so much better than the painted drywall. So now when the dog goes crazy with her zoomies she won’t mark it up so much.
Please ignore the laundry basket in the background. These walls are the back of my laundry room (closet) so this is pretty much real life right here, LOL!
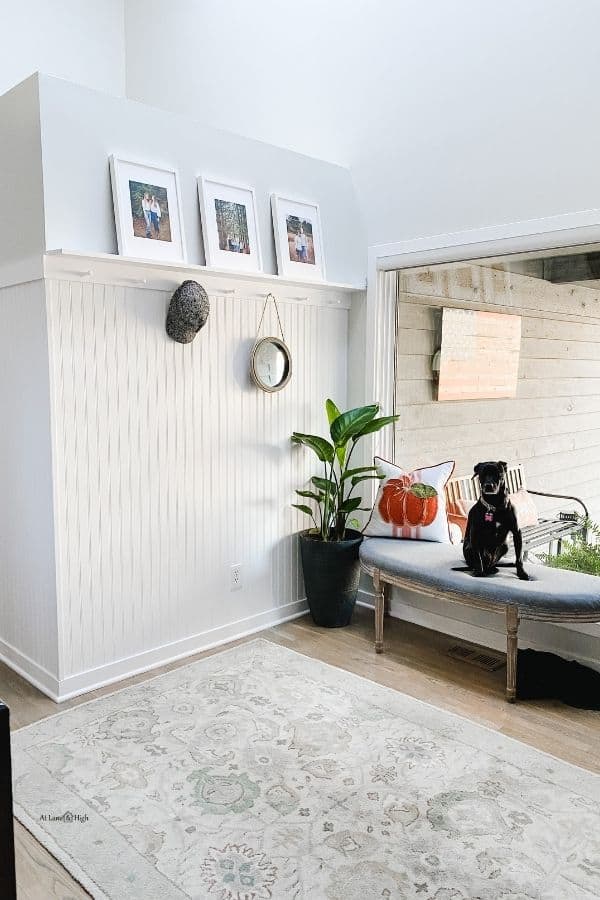
I have been asked why I don’t put the bench under the pegs and the reason is right there, my dog. She loves this window, it’s to the front of the house.
She likes to supervise the neighborhood from this window and if I don’t have the bench there she destroys the window sill with her nails. So the bench protects the sill and she loves just sitting there patrolling for people and dogs, haha.
Other DIY Wall Treatments You Might Like:
- DIY Board and Batten Box Molding in a Stairwell
- How to Inexpensively Create a Reclaimed Wood Wall
- How to Inexpensively Install Shiplap for a Farmhouse Style Look
- DIY Picture Frame Molding on the Walls
- How to Create a Focal Wall With a Herringbone Stencil
- How to DIY a Board and Batten Wall Inexpensively

DIY Beadboard Wall
DIY Beadboard Wall {How to Install Beadboard over Drywall}
Update your space by creating a DIY beadboard wall to add interest. It's easy and very cost-effective.
Materials
Instructions
- Measure the wall and determine how many panels of beadboard you will need.
- Mark the studs on the wall so you know where to nail in the panels.
- If you have any outlets or light switches to cut out, do that now with your jigsaw.
- Put the beadboard panel on the wall and nail it in using your nail gun. Make sure you nail into the studs.
- Attach the corner molding on the corner of the wall using your nail gun.
- Cut the top board to length and if you have any corners use your miter saw to make 45-degree angles. Nail them onto the wall just above your beadboard.
- Cut your shelf to length and nail it onto your top board and use L brackets on top of the shelf to secure to the wall.
- Fill nail holes with wood putty. Caulk where the shelf meets the top board, where the top board meets the beadboard, and where the beadboard meets the wall if at a 90-degree angle.
- Sand any wood putty and prime all bare wood.
- Paint all the wood. Leave appropriate dry time in between coats. It may take up to 3 coats of paint.
- Screw in the pegs and prime and paint them.
Notes
When you add wood to the wall any outlets or light switches might need to be brought forward as well so you can replace the cover. Use spacers to accomplish this. Just remember to cut the power to the outlet or switch before working on this.

As a licensed Real Estate Agent and an avid home decorator, I strive to give my clients the very best I can when it comes to staging, selling, and decorating their homes. I have lots of experience with paint color choices and love to DIY my home so I can have everything just the way I want it. I share my ideas and projects with the world in the hopes that I can help others have their homes just the way they want as well.


thank you for this post! Im going to follow your steps and do this in the coming weekends. A question: do i need the corner moulding if i dont have any external corners? And: how far apart did you space your pegs??
Hi Kimber! I am so excited you are doing this on your walls. No you don’t need the corner piece if you don’t have any external corners. And my pegs are about 10 inches apart. Thanks!
I am installing bead board paneling in my bathroom. It is 3/16″ thick hardboard and finished white by DPI. The instruction label on the product says to leave a space for expansion between each sheet the thickness of a dime and to leave an expansion gap at the bottom and top of each panel so it can move if needed by expansion.
I’m wondering how bead board can move if it is nailed, or nailed and glued to the wall. By not gluing it, as you did, it would be more free to move if needed.
I’m wondering if you left any spaces for expansion and if your product even mentioned the need for expansion joints.
Hi Harold. This is really interesting, my beadboard had no instructions on it. I did not leave a gap but I have noticed that in the winter when we have the heat running and the house is more dry the line is more noticeable between pieces. I think that the humidity in the house can make the wood swell or shrink, hence the movement your instructions talk about. I hope that helps answer your question.
It looks like you didn’t remove your baseboard. I’ve seen some people do that, and they install the beadboard behind the baseboard. Why did you choose not to? And do you wish you did, or does it still look great without removing? Trying to decide whether or not to remove ours! Thanks!
Hi Katie. I didn’t remove mine because I have 1×4 baseboards. They aren’t decorative at all so I chose not to remove them. If I had decorative baseboards I probably would have. I hope that helps.
Hello! I really want to do this as a half wall and then do wallpaper up the rest of the wall for my first diy in my new home. Is this project suitable for someone who doesn’t have a ton of diy experience or would it be better to hire a professional?
Hi Kate. I think this is totally doable for a DIY project. Have them cut the wood at Home Depot so you don’t have to worry about that part. Give it a go. Worse case scenario is that it doesn’t go well and you bring a pro in later.