
DIY Built-Ins Using Big Box Store Cabinets
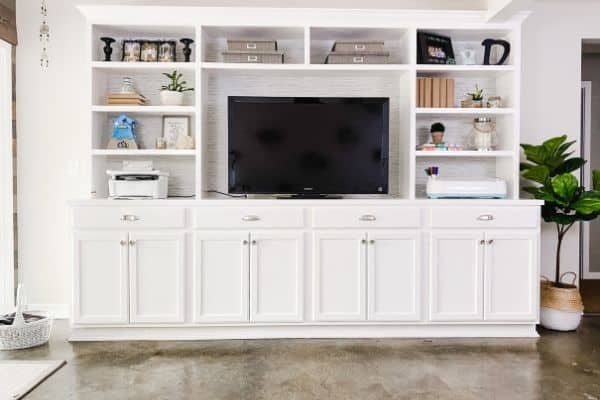
I am so excited to share with you the new DIY built-ins that I created for my home office/den space. It’s been a long time coming and the reveal is finally here! The amount of additional storage space I gained from these built-ins is amazing. I am able to hide all my crafts, work stuff, and office supplies behind closed doors. And I still have room for beautiful home decor.
I have been working on this project for some months. I started it around Mother’s Day and finished it up around October 15. Seems like a really long time right? Well, I had to stop several times to work on some other things that were time-sensitive.
In the Spring I had to stop to work on my Landscaping project where I redid part of the yard and discovered several large rocks that had sunk down a few inches.
In July. I had to stop for a major golf tournament that happens almost in our backyard. So I couldn’t use my power tools outside.
Then in September, I stopped to work on the $100 Room Challenge, renovating my patio. All great projects but it put off my finishing these built-ins. I am sure you can relate right, life!
*This post contains affiliate links. For more details see my full disclosure.
What You Need to DIY Built-Ins
Let me give you a quick overview of the steps I took to create these built-in bookcases.
- Remove Trim and save for later
- Install Cabinets to walls
- Re-install Trim and add new where needed
- Glue Shiplap to the unfinished sides
- Glue 1/4 inch plywood to the top of the cabinets
- Screw together wood for the countertop and glue it down to the plywood, secure with a few screws
- Install trim around the countertop
- Sand and stain (or paint) top
- Build the upper shelves
- Insert screw plugs and sand shelves smooth
- Install shelves on top of cabinets
- Add trim and crown molding
- Wood putty the nail holes and caulk where needed
- Prime
- Paint
- Polycrylic
- Install hardware and let cure for 1 week
Seems like a lot of steps right? It is, I won’t lie. This is a huge project but none of the steps are all that hard. As long as you have the right tools this project isn’t all that hard, just a little time-consuming.
Tools and Materials You Need to DIY Built-Ins
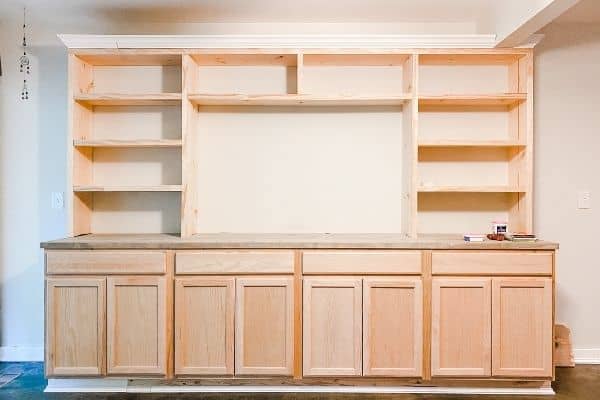
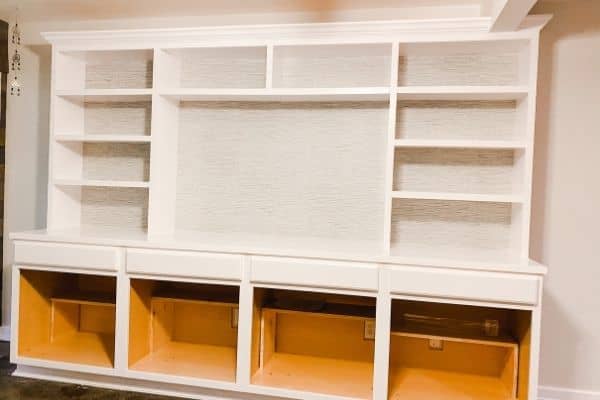
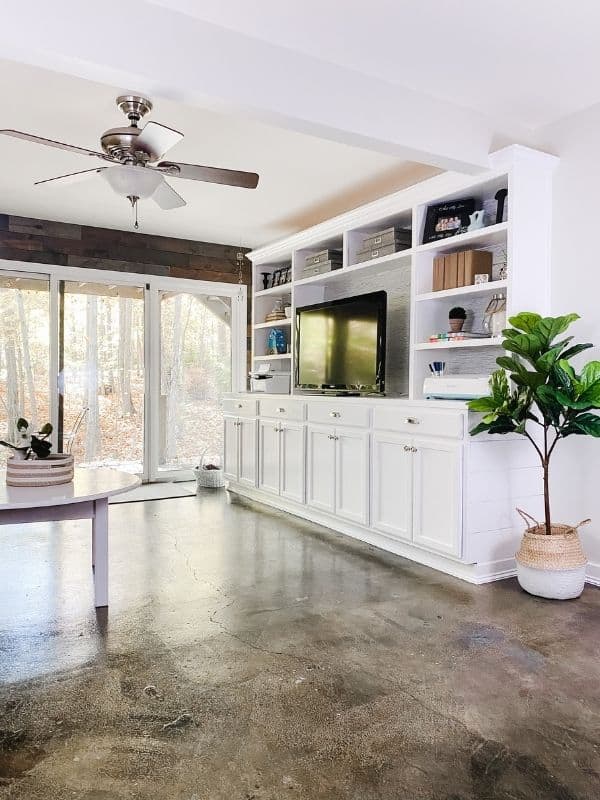
My built-ins are 10 feet wide and the base cabinets are 30 inches wide and 36 inches tall. The shelves are 4 feet tall on top of the cabinets. I left a large opening in the center for a TV with one shelf above and sets of shelves on either side.
Your project might be a little different in its dimensions but I will leave you with all the details of what I did.
Wood Used
- 4-30″ base cabinets (make sure they aren’t sink bases)
- 3-1x10x10 for the cabinet top
- 1-4×8 sheet of 1/4 inch plywood
- 1-1x4x8 for the baseboards
- 8-1x12x8 for the shelves
- 15 feet of crown molding
- Trim for countertop and sides of shelves
- 1×2’s trim for shelves
Tools Needed
I have included links to Amazon or Home Depot for the specific tools I have.
- 1-inch nails
- nail gun with compressor
- Drill
- Kreg Jig
- Kreg Jig Screws ( I bought this kit)
- Kreg Jig plugs
- Circular saw
- Miter saw
- Dremel (This is the kit I have.)
- stud finder
- tape measure
- level
Materials
You might have a lot of these on hand already. Click on any of the items to see them on Amazon.
- L bracket
- Wood Glue
- Wood Putty
- Caulk
- Sandpaper
- Primer
- Paint or stain of your choice
- Polycrylic or polyurethane
- Cabinet Hardware of your choice
- Peel and Stick Wallpaper (This is the one I used)
How to DIY Built-Ins
I am going to break this down into small steps so I can show you how easy it all really is.
Step 1 – Remove the Trim
I got this part done right around Mother’s Day before I had to stop working on it for the landscaping project. This is probably the easiest part. Using a pry bar (this is the one I use) and a hammer gently pry off the existing trim and be careful to save it for use later.
Step 2 – Install the Cabinets
Find the center point on the wall and mark it using a pencil. I have 4 cabinets so I placed two cabinets on the wall using the center pencil mark as the point where the cabinets meet.
If you have outlets or cable plugs on the wall you will need to cut out the back of the cabinets to accommodate them. I used my Dremel to do this. I measured and marked the back of the cabinet. Using a drill I created a hole and using the Dremel cut out the square for the outlet.
In hindsight, if you have a jigsaw this would have gone much cleaner and been much better looking.

Once that was done I used my stud finder to find the studs on the wall and I also marked them with a pencil. I put the cabinets against the wall and screwed the cabinets into the wall where I marked the studs.
Once I had one cabinet installed on the wall I placed the next cabinet next to it and using a level made sure it was even then drilled a pilot hole into the side of my second cabinet. Then I screwed the two cabinets together. Then attach the second cabinet to the wall.
Continue this process for all your cabinets, attaching them to each other as well as the wall.
Step 3 – Re-install the Trim
Now that you have your cabinets installed you can re-install the trim. Since the existing trim that I removed already had a perfect cut for the ends of the wall, I used those pieces to cut down to fit between the end of the wall and the cabinets.
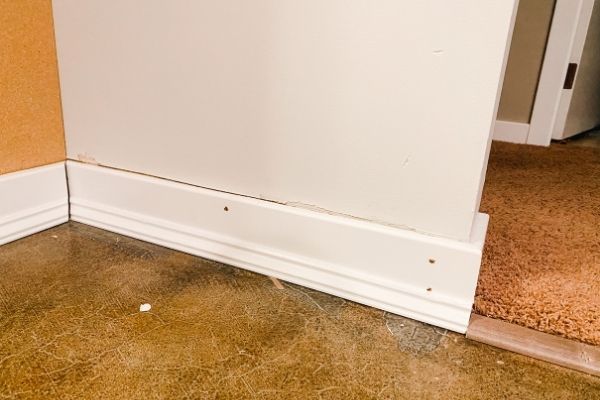
Then I cut the old trim to fit the sides of the cabinets and then I put the last bit on the front. I had to buy one new board to accommodate the rest of the length since I have added linear footage by installing cabinets. Make sure you use miter cuts for all the corners, it looks more professional than butting the ends together.
In the finishing stages, I will add caulk to the corners to cover up any gaps. You will never know they are there. In this photo, I haven’t nailed the shoe molding down. Sorry about that. It looks much better once it’s nailed down. Of course, I forgot to take a pic after…..ugh.
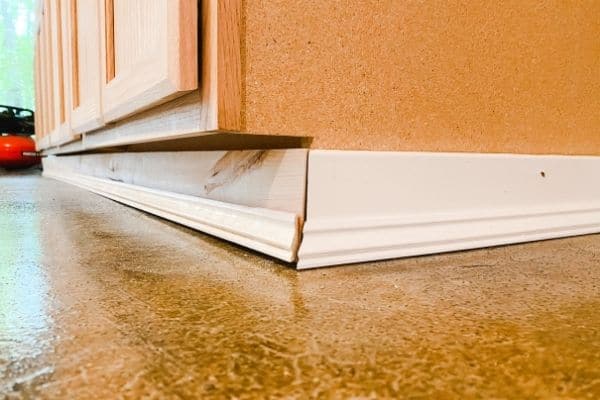
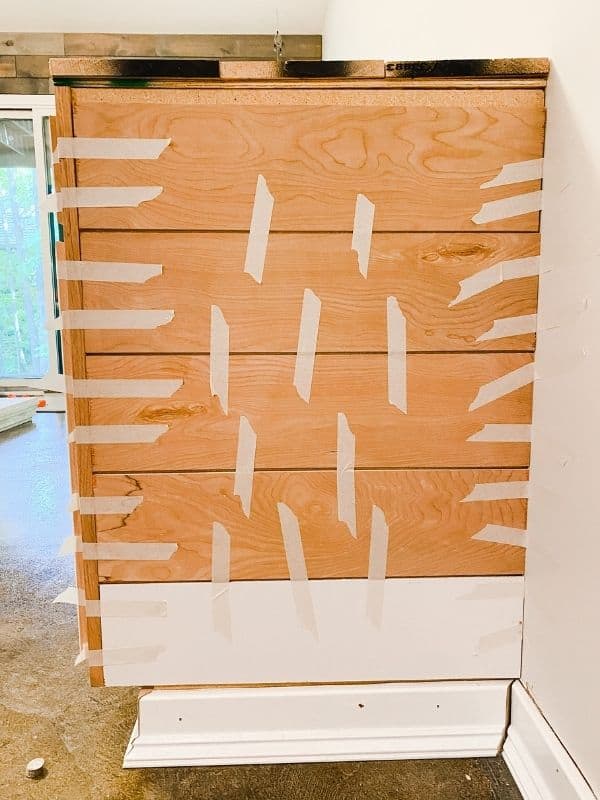
Step 4 – Glue Shiplap to the Outside Ends of the Cabinets
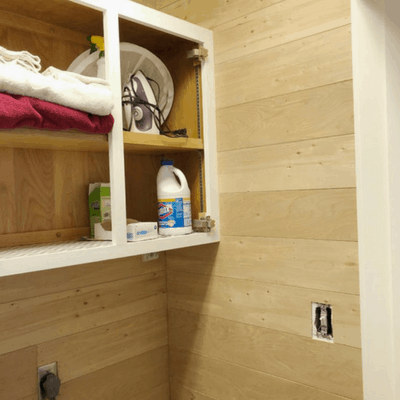
The cabinets I bought were unfinished on the outside of the cabinets. Using some leftover faux shiplap from my Farmhouse Laundry Room Project I cut pieces to fit the ends of the cabinets, used wood glue to attach and masking tape to hold into place. It was dry in about half an hour.
If you don’t have leftover shiplap like I did you can purchase a piece of finished plywood that is very thin and attach it with wood glue. This would have a really nice look as well.
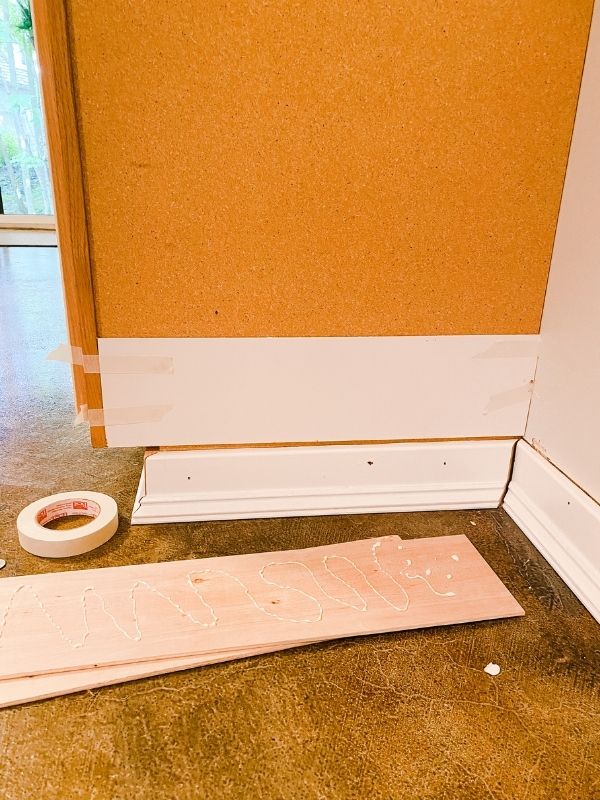
Step 5 – Attach 1/4 inch Plywood to the Top
Using my table saw (or you can have this cut at the hardware store) I ripped a 4×8 sheet of plywood in half so it was essentially 2 pieces of 2×8 plywood. Then I cut each one down to 60 inches.
Why did I do this? I have 4 base cabinets at 30 inches wide each. If I used the full 8-foot length the wood would have stopped 6 inches into the last cabinet with nothing under the end to support it.
I didn’t want this, I want the whole thing to be very sturdy and supported so I cut each piece down to 60 inches which meant they both covered 2 cabinets and ended at the edge of a cabinet.
Using wood glue I attached the plywood to the edges of the top of the cabinets.
Step 6 – Building a Counter-Top
The cabinets are 24 inches deep so I used 1x10x10 pieces of wood for this step.
Why use 1×10’s? You would think that I should use 1×8’s because 3 of them would equal 24 inches but 1×8’s aren’t really 8 inches wide.
To put it in a nutshell, in the milling process the wood is actually planed down for a smoother surface which takes some of the wood off. So the actual dimensions are smaller than the listed dimensions.
Because of this I had to rip down my 1×10’s so each one equaled 8 inches wide to get the full 24 inches. You can do this with a table saw like I did or have it done at the hardware store, many of them will cut wood for you.
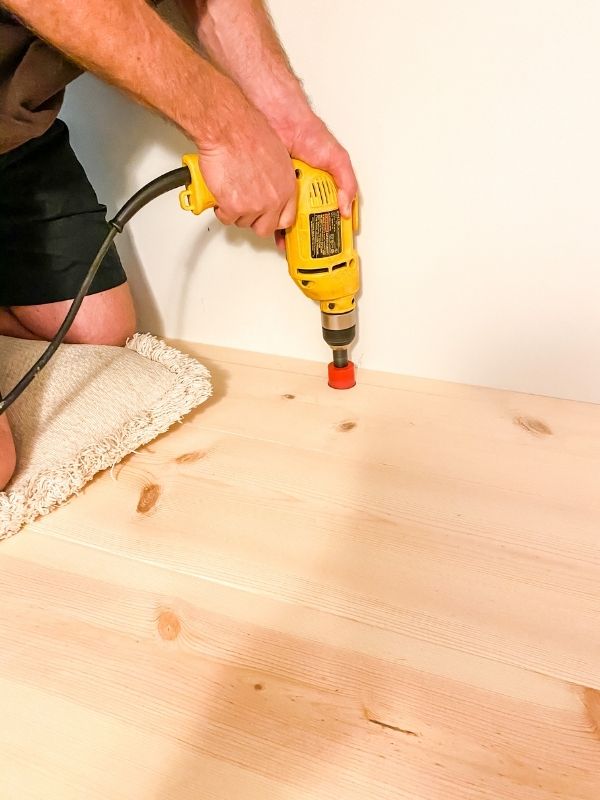
Using my Kreg Jig I attached each board together. Then I put a lot of wood glue on the plywood then laid the 1×10 countertop pieces (screws side down) on it and weighed it down to dry.
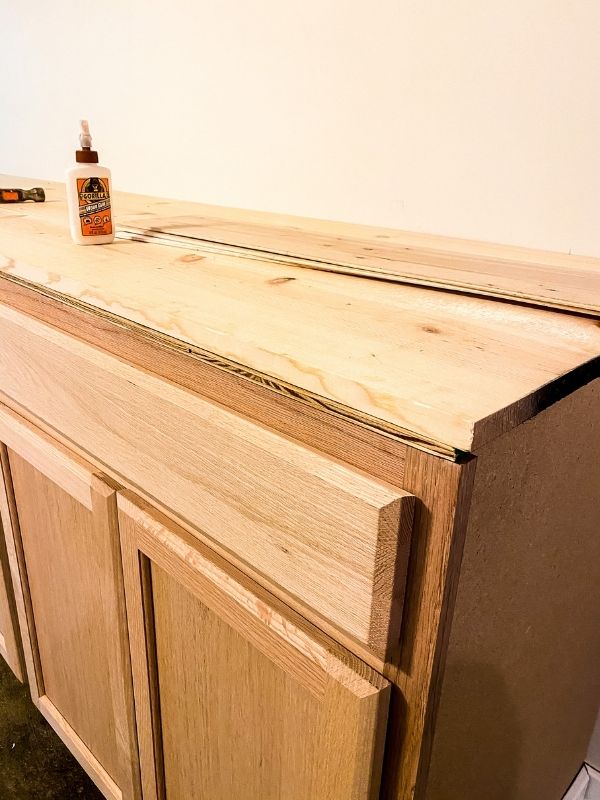
I also put a couple of screws in the plywood to the countertop from the underside to add additional sturdiness.
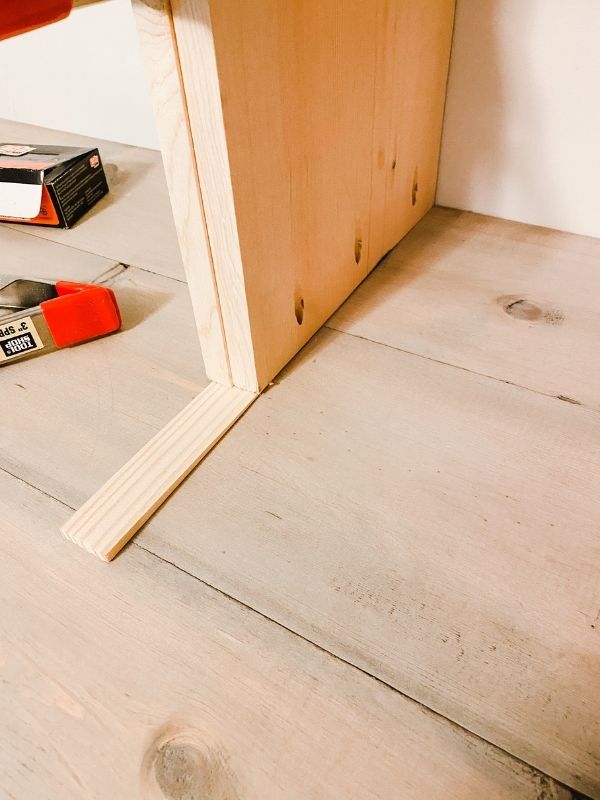
Step 7 – Install Trip Around Countertops
I used this trim for the countertops. It’s very thin but it’s 1 1/2 inches wide which will not only cover the edges of the 1×10’s but the plywood used underneath.
Using the miter saw and the nail gun cut the angle edges and attach the sides and front. I used 2 eight foot pieces of this trim. I liked it because one side is curved so the edge of the countertop doesn’t have sharp edges. You don’t have to use the exact same one, you can choose whatever you like from the hardware store.
I am kicking myself for not taking a close-up of the trim around the counter.
Once you finish this step you will really be able to see your built-ins coming together! It’s very exciting!
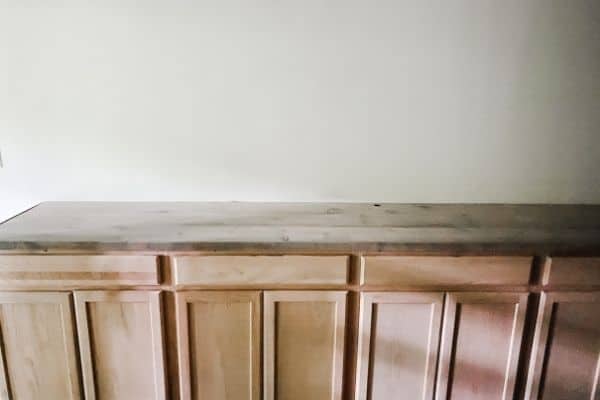
Step 8 – Sand and Stain the Top
I suggest you sand down the top at this point. It will be much easier to do it now before the shelves get installed on top.
If you plan to stain the countertop now is a good time to do it. I planned to stain mine and did so at this point (however I changed my mind later in the process, stay tuned).
Do not put any poly on yet. You will want to poly the whole thing and it can all be done at the end.
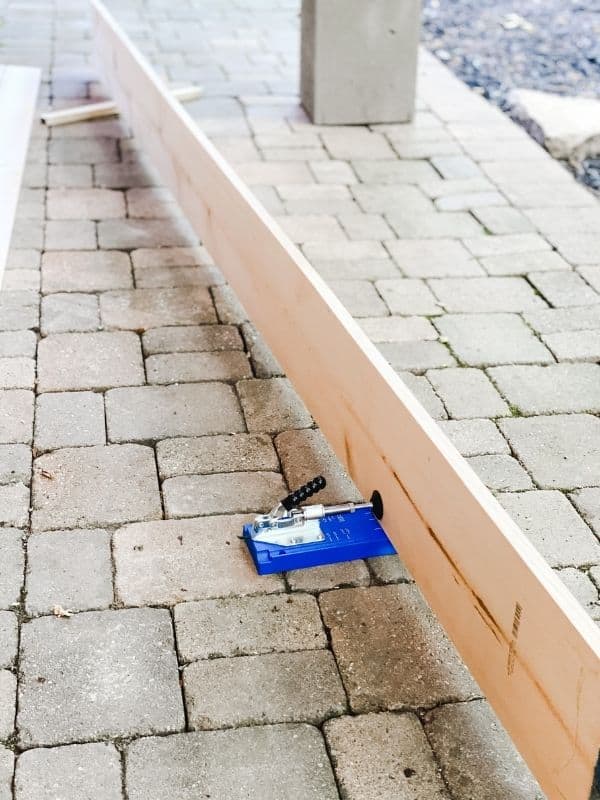
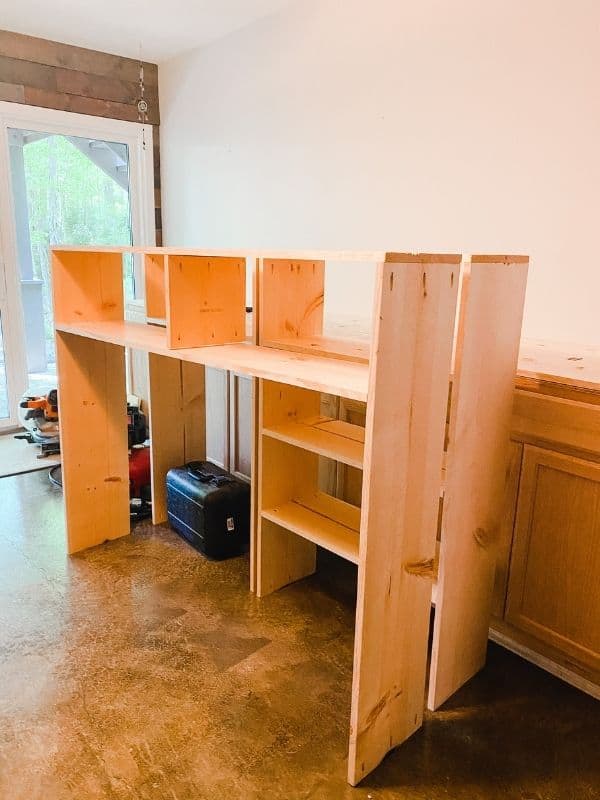
Step 9 – Build the shelves
This is also an exciting step. You will need your circular saw for this step, as well as the Kreg Jig and drill.
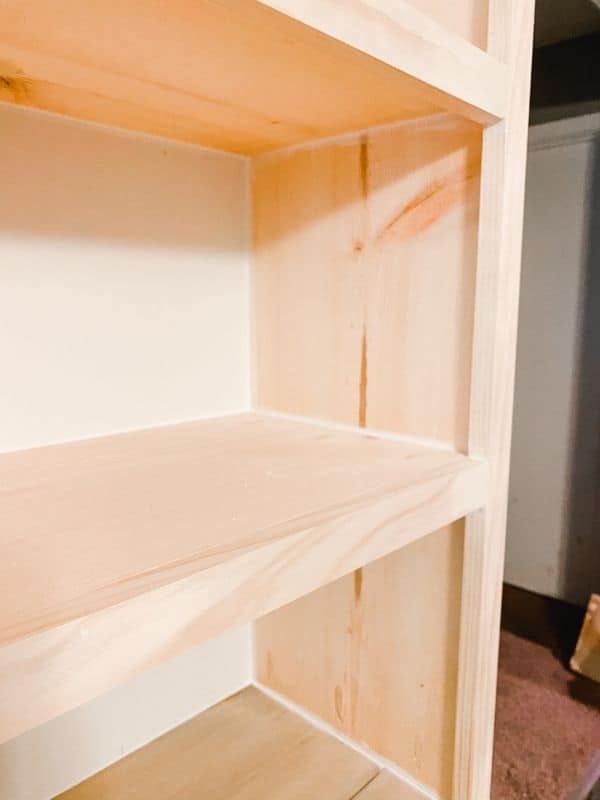
I measured 4 feet long for the vertical part of the shelves and cut four from the 1×12’s.
I cut the remaining wood for the shelves. The vertical 1×12’s are 30 inches apart so the shelves in between will be 28 1/2 inches long. (That’s because the 1×12’s are only 3/4 inch thick, remember the wood gets planed down). I created 3 shelves on each side of the tv, and one for the top.
Above where the tv will go I needed 2 long pieces, 58 1/2 inches long. I also cut one piece to be a brace in the middle of the long shelves to support those long shelves.
Would you like to save this?
Using my Kreg Jig I screwed everything together. for the two sets of shelves on either side of the tv and one in the center where the tv will go. This is your chance to decide how tall you want the shelves to be. It’s totally personal preference. I did want them to be even on either side of the tv.
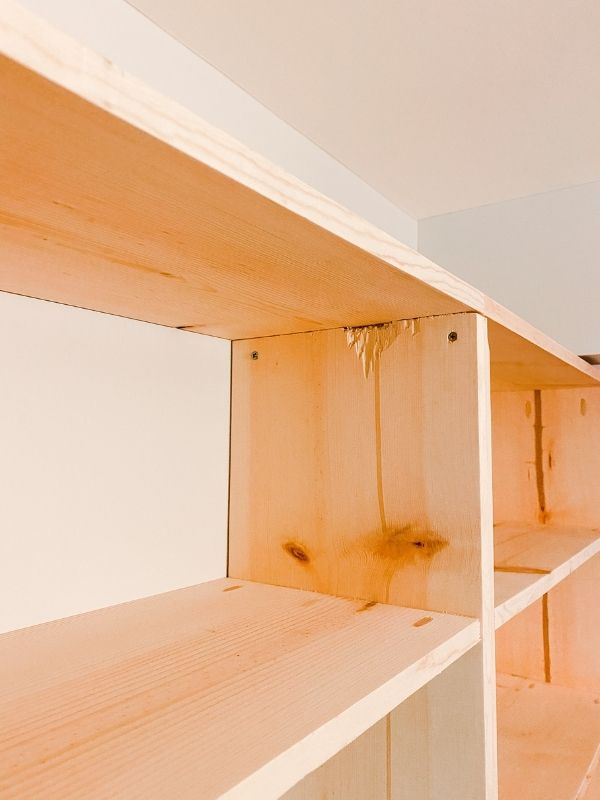
Step 10 – Insert plugs and sand shelves smooth
The plugs go into where the Kreg Jig screws went. This adds a finished look so you can’t see the screws. I used a dab of wood glue on each one because if you don’t and you try to sand they just come right out.
Once the glue dries give everything a good sanding. I did this outside to keep my house from getting too messy.
I started with 80 grit, then went to 120 grit and finished with 220 grit sandpaper. You can use a palm sander if you like or you can do it by hand. Doing it by hand will work, just takes a little more elbow grease.
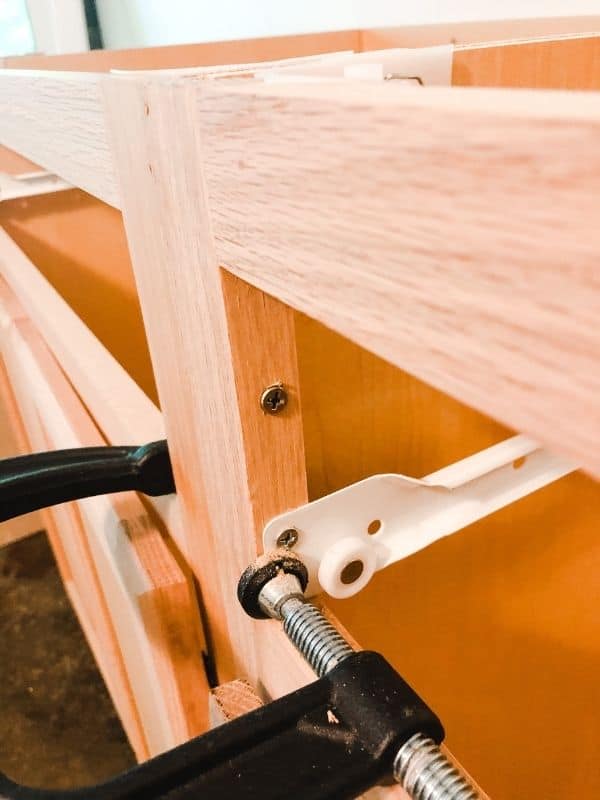
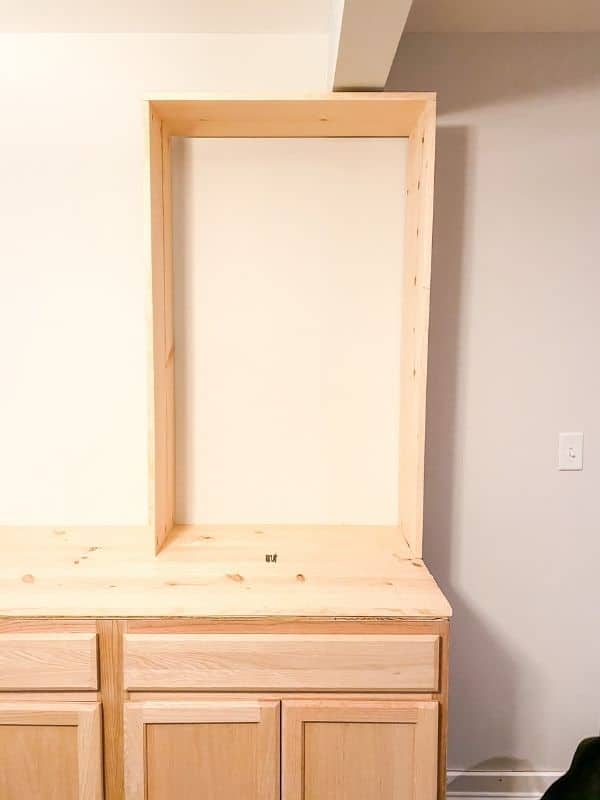
Step 11 – Install Shelves on Cabinets
This is another really exciting step. Before you bring your shelves in from outside give them a good wipe down with a damp cloth to remove any sawdust.
Put one of the shelves on top of the cabinets on the end. Make sure the vertical piece lines up with the edge of the cabinet and using the Kreg Jig screw it down to the countertop. Also, secure to the wall above the shelves using an L bracket.
Continue with the center shelf and do the same thing. Once installed on the countertop screw together the two sets of shelves and secure to the wall on the top using the L bracket.
I know this piece of wood got chewed up a little with my circular saw. It’s not pretty. I didn’t have the wood secure and I got a lot of kickback. I will fill it in with wood putty and you will never know it was there.
Repeat with the last set of shelves.
Step back and really enjoy the fruits of your labors! There is light at the end of the tunnel!
Step – 12 Add Trim and Crown Molding
I used 1×2 pieces to trim out the front of the shelves. This covers up where the different shelves are up against one another. This step makes everything look more professional.
Using a miter saw cut the pieces the correct length and a nail gun to attach to the shelves both vertically and horizontally.
Add crown molding to the top of the shelves as well. I had never done this before so I did what I always do, go to YouTube! I found this video to be really easy to understand.
Here is a link to the video that explains how to install it on the top of shelves.
I found some raw edges on the outside of the shelves that I didn’t like so I purchased some trim to go around the edges. This really made the outside of the shelves look so much better!
The trim I purchased is similar to the trim I used on the countertop but it’s completely square, not rounded at all. I installed using my nail gun.
Step 13 – Wood Putty and Caulk
Now you need to add wood putty any place you put a nail.
Use caulk any place wood meets wood. So around all the edges of the shelves, where it meets the wall and where it meets the counter. Also where all the trim is.
I went through 3 tubes of the kind of caulk that is used by hand. I didn’t think a caulk gun would fit into all the nooks and crannies.
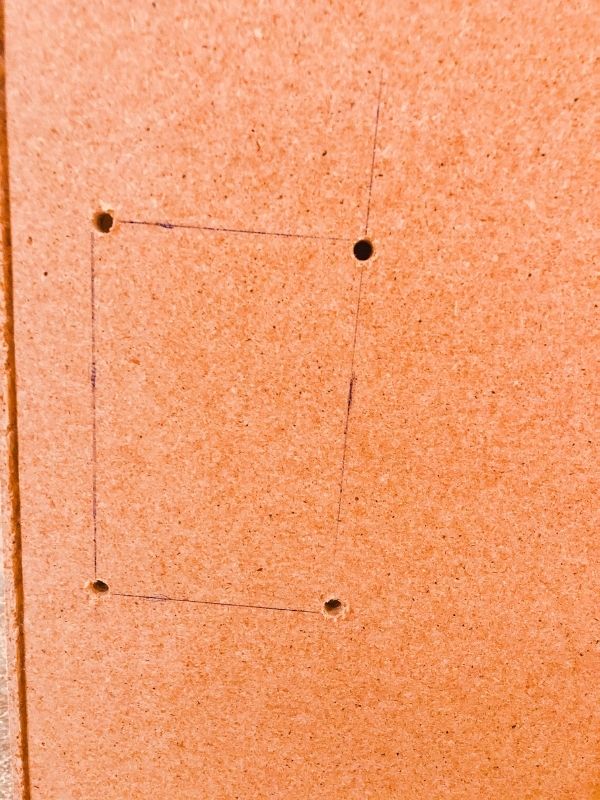
I used this time to screw a hole in the countertop for cords to go down into the cabinet to plug everything in. Actually, I should say my husband did it. I was too chicken! LOL. All went well though.
I also had him put a small hole in the vertical shelves so I could bring the cords of my printer and Cricut over and down the hole in the counter and all can plug into the same area.
Step 14 – Time to Prime
Sand down any wood putty and prime the entire piece with a good primer. Here is the one I used. My DIY built-ins took an entire quart of primer.
You will notice I had stained the countertop but then I primed over it. Once I got the wallpaper and held it up to the countertop I felt that they clashed with one another big time!
Plus I just couldn’t get the counter to look like I wanted. I wanted it to look like the wood wall I did a couple of years ago but Home Depot now sells Varathane Stain instead of Minwax. I do not like the Varathane Gray Stain at all.
There is hardly any pigment in it and I ended up doing a gray wash on the countertop to get close to the look I wanted.
In the end, it didn’t play nicely with the wallpaper so I decided to go ahead and paint it white like the rest of the shelves and cabinets.
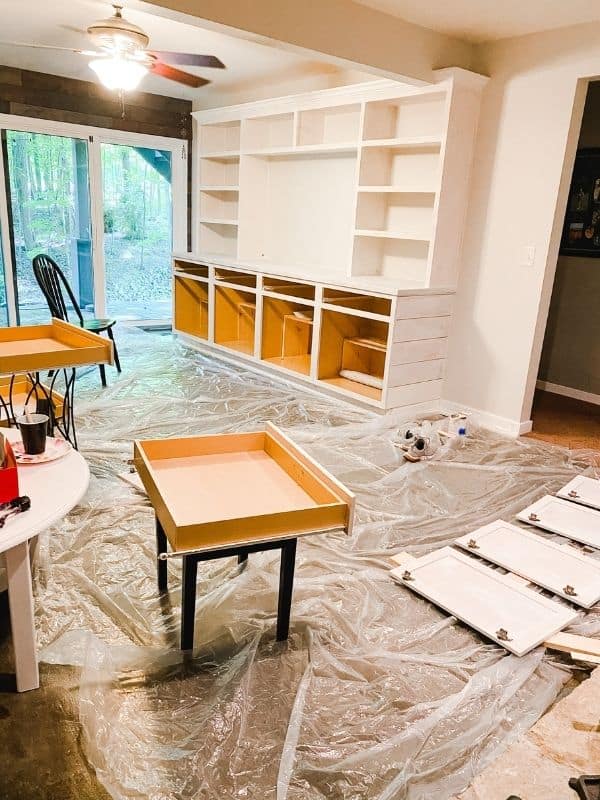
Step 15 – Paint
This might seem like an easy step but it’s not. The DIY built-ins are large and with lots of tough spaces to get into, each coat took me about 3 hours to do. And not to mention it took 3 coats of paint, with the drying time this took a long time to get done.
I used an acalyd paint from Home Depot. Lowes, Sherwin Williams, and Benjamin Moore all sell a similar product but this is the paint I used on my board and batten in my dining room and the box molding on my stairwell and they have held up really well.
I also think that using Fusion Mineral Paint would be a great choice. I used it on my Vintage Desk Makeover which I will use in the same room. It’s a great paint for use on furniture and has a tough topcoat you can also purchase and apply.
Step 16 – Polycrylic
Because I used white paint on this project I applied polyacrylic to seal and protect it. Polycrylic is water-based and will not yellow as polyurethane does. If you use light-colored paint or stain always use polyacrylic. If you have dark paint or stain then use polyurethane.
Let this step sit for at least a week before putting anything on the counter or shelves. This gives the paint and poly time to not only dry but cure and harden. This will help keep the piece from marking up when you put stuff on it.
Step 17 – Install the Hardware And Wallpaper
The previous owners of my house left a knob and a pull from the kitchen renovation. I decided to use them on my new DIY built-ins. They came from Restoration Hardware so I ordered the rest of the knobs online.
Cabinet hardware can get very expensive. I spent a little over $200 on this step which is about 20% of the entire project, which is a lot! This is one of those things where you get what you pay for.
Buy cheap hardware and you will get cheap knobs and pulls. This is something that will get a lot of wear and tear so you need it to be sturdy.
Check out my post on Cabinet Hardware Trends to get more ideas on finishes and styles for your built-ins.
Once you have your hardware purchased use masking tape or blue painter’s tape on the cabinet doors and drawers to drill pilot holes where the new hardware will go. The tape helps keep the wood on the cabinets from splintering.
Once the hole is drilled removed the tape and add the knobs and pulls!
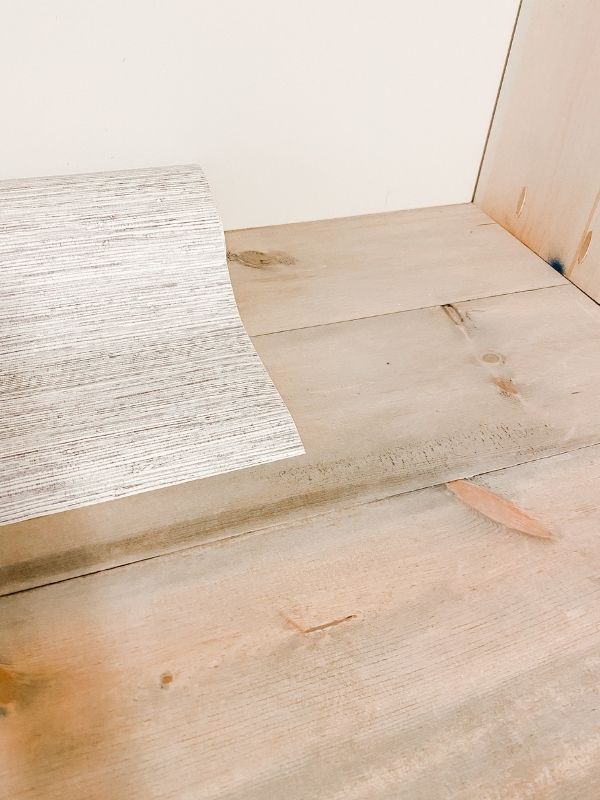
Use peel and stick wallpaper for the backs of the shelves (essentially on the wall) to create dimension. I love the look of grasscloth but I don’t love the price. I purchased from Amazon this product that isn’t real grasscloth, just pictures of grasscloth. Totally affordable and a great solution.
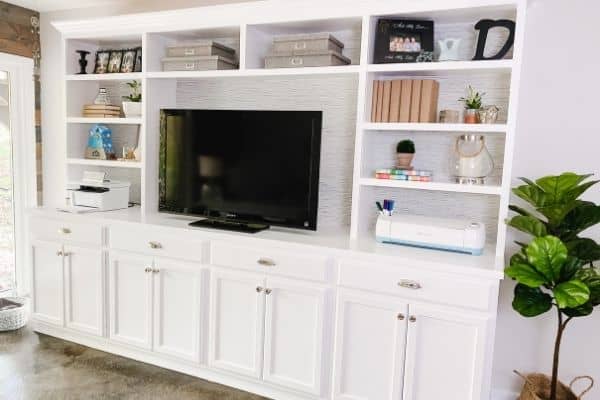
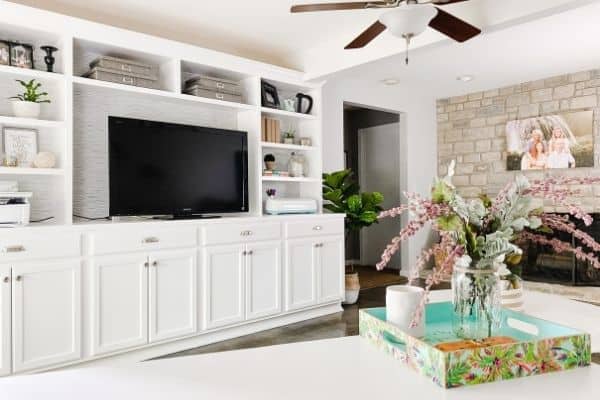
DIY Built-Ins – The Finished Product
All you need to do now is add your “stuff” to the shelves and cabinets. Since my DIY built-ins are in my home office/den space I need the cabinets to hold lots of stuff. I have office supplies, Real Estate supplies, entertainment stuff, and craft stuff.
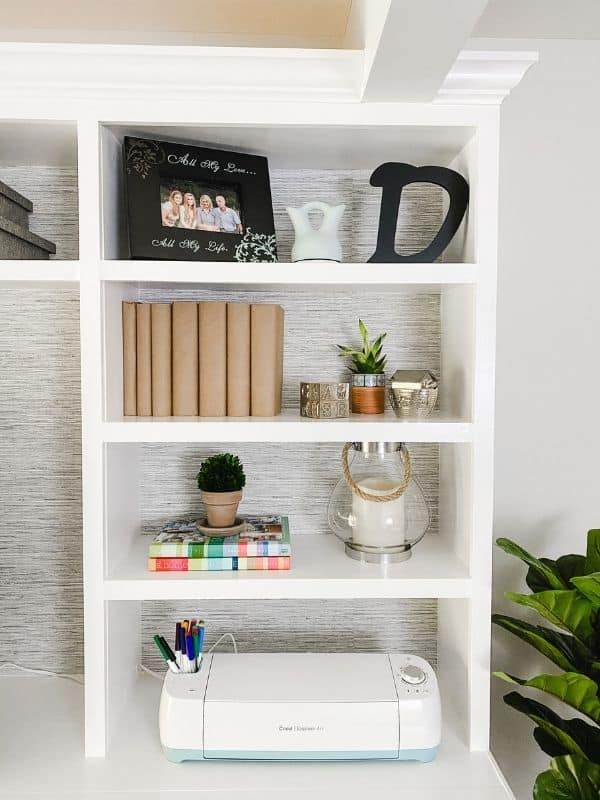
On the shelves, I have my printer on one side of the tv and my Cricut on the other. I added decor from my own home, essentially I shopped my home to decorate the built-ins.
The only thing I purchased was the hurricane with the candle in it and the boxes on the shelves above the tv. Everything else came from what I already had.
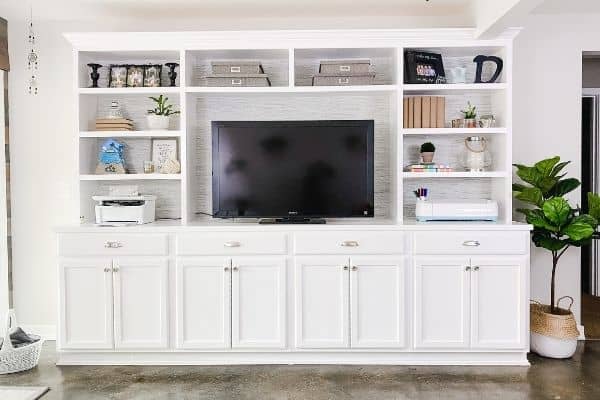
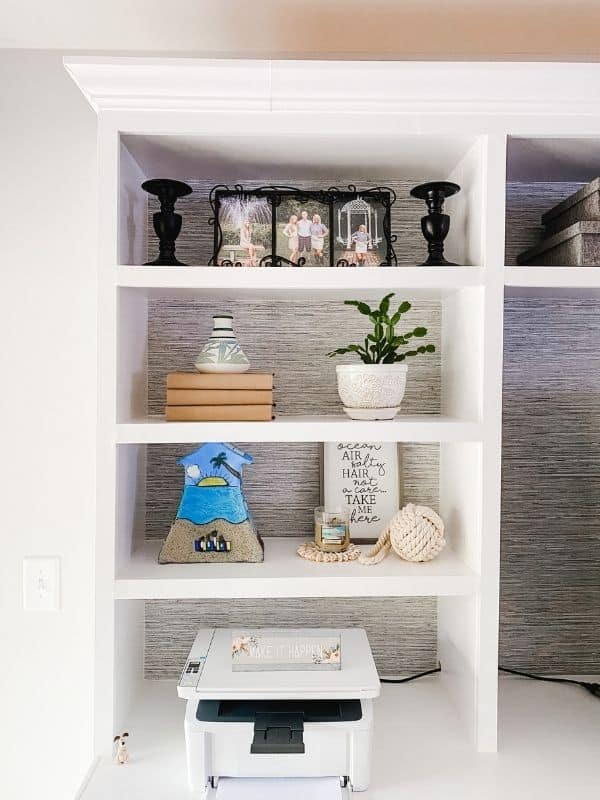
This is the view from my desk. I couldn’t love it more!
Related DIY Built-Ins Blog Posts
- How to Inexpensively Install Shiplap for a Farmhouse Look
- How to Build Industrial Shelves
- How to Make a Wood Stump Side Table
- How to Stain Concrete Floors
- A DIY Vintage Desk Makeover Using Fusion Mineral Paint
- DIY Countertop Ideas


If you are interested in creating some DIY Built-Ins in your home I hope this tutorial was clear and easy for you to understand. If you have any questions feel free to leave a question in the comments! Happy building!!!

As a licensed Real Estate Agent and an avid home decorator, I strive to give my clients the very best I can when it comes to staging, selling, and decorating their homes. I have lots of experience with paint color choices and love to DIY my home so I can have everything just the way I want it. I share my ideas and projects with the world in the hopes that I can help others have their homes just the way they want as well.


This is incredible! It looks so professional and like it would cost thousands of dollars – you did an amazing job!
Thank you so much Melissa!
Hi Wendy – I read the article in Apartment Therapy about your amazing built-in. I just want to also complement you on an outstanding tutorial. Your instructions and photos are perfect to understand how to do the job! Thank you
Thank you so much Bastien!
Thank you for walking us through your process! I had my kitchen cabinets redone by a local cabinet refinisher and I loved how the finished results looked. Now I want to add cabinets everywhere in my home haha… but I think built-ins in my living room are a good place to start. It definitely seems like a doable DIY project! Thank you for sharing!
Hi! Thank you for the tutorial! Could you share how much the total cost of your project was?? Thanks!
Hi Dani! All in the entire project was about $1000. The cost of wood has gone up a bit since then so if you were to do it now it might cost a little bit more. But you could save money by getting cheaper hardware. I sort of splurged on the ones I got from RH.